Sip Phone Manual if You d Like to Make a Call Please Hang Up and Try Again
Zoiper Windows Installation and Configuration
Installation instructions
-
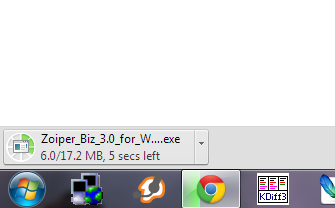
After the download prompt appears, save the file and look for information technology download successfully.
-
-

-
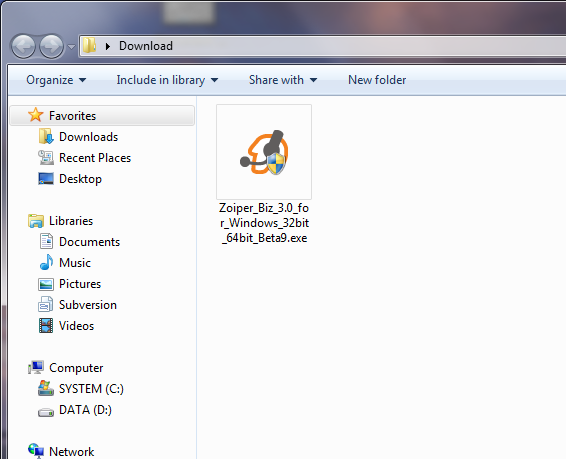
Next go to your downloads directory and find the Zoiper installer, then execute it.
-
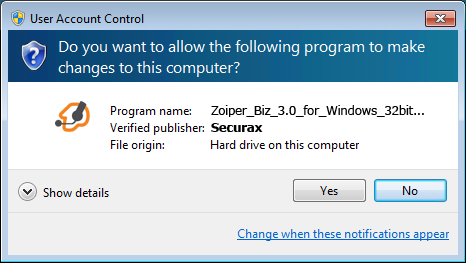
A verification prompt will appear, click "Aye".
-
The Zoiper installer will start, click "Next" on the commencement screen of the Setup sorcerer.

-
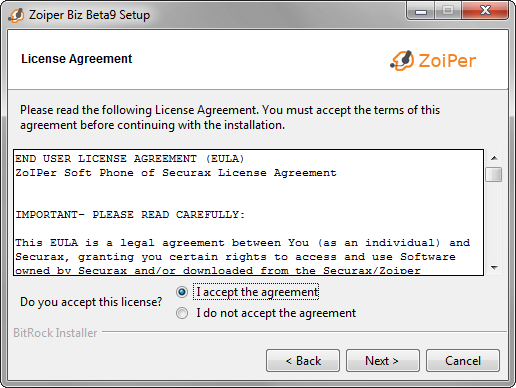
Read the license understanding and click "Side by side" after accepting the understanding.
-
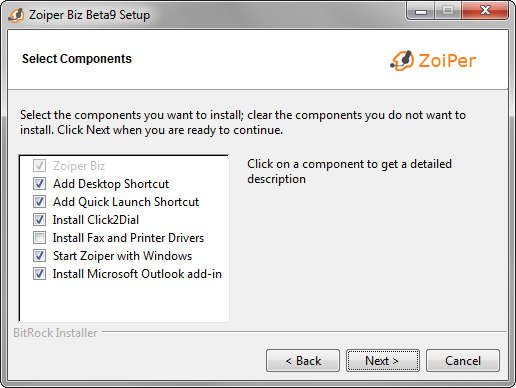
Select which components to be included.
-
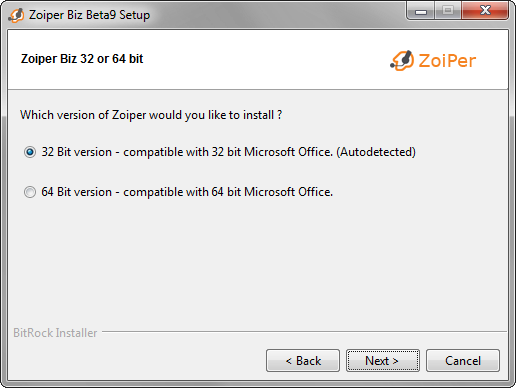
Select the version you would desire to install.
-
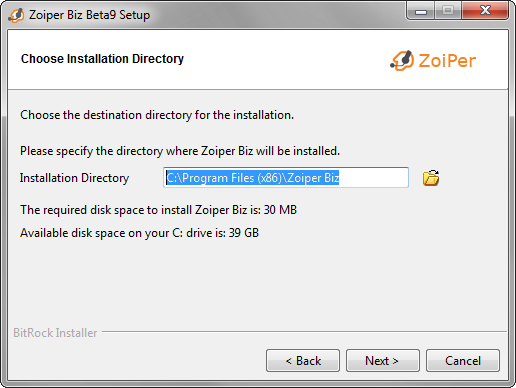
Select an installation directory (Best to keep the default 1).
-
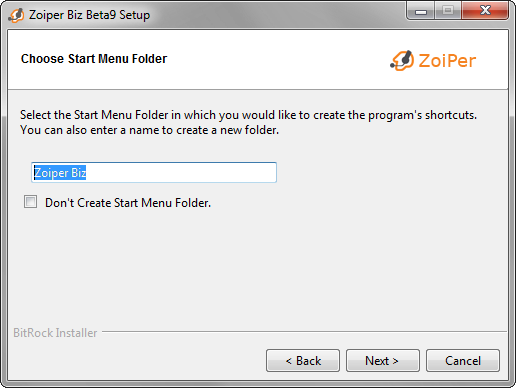
Cull a start bill of fare folder.
-
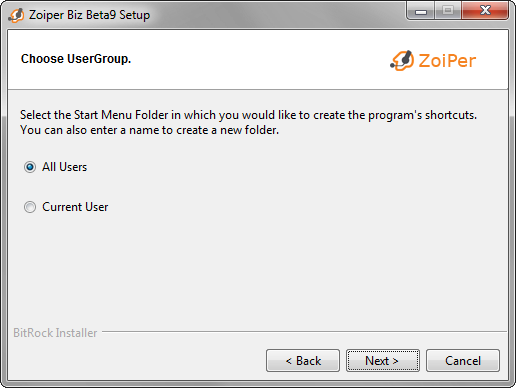
Select which users should be able to use the new Zoiper installation.
-
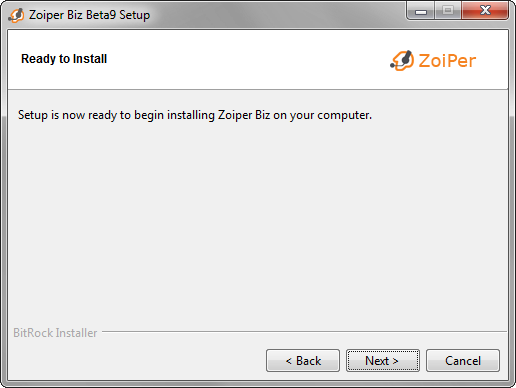
The setup is now ready to brainstorm the installation. Click "Adjacent" to keep.
-
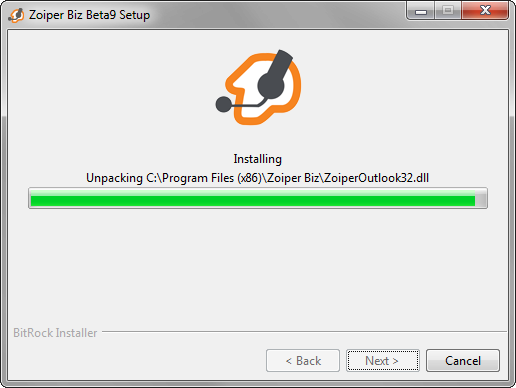
Wait while the Zoiper installation finishes.
-
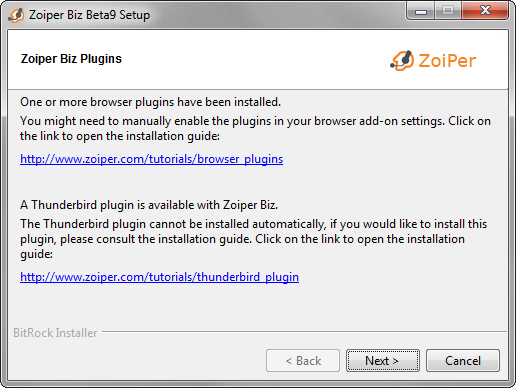
The install magician volition inform you for the Zoiper Biz Plugins which should be already installed.
-
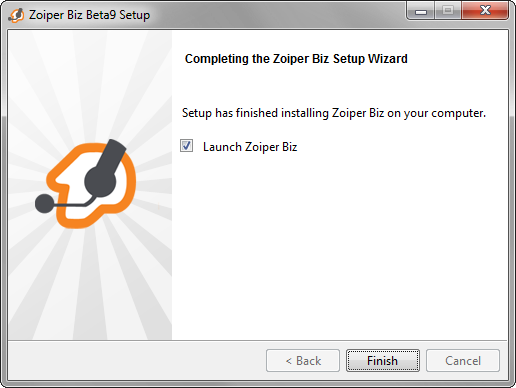
The installation is consummate. Click "Terminate" to launch Zoiper.
Activating the Zoiper License: (Zoiper Business Edition Only)
If you are using Zoiper Concern Edition, an activation screen volition appear on the kickoff startup. Delight make full in the email address you used to buy Zoiper as the "username field". Y'all tin notice the password in the mail that was sent to y'all directly after your buy.
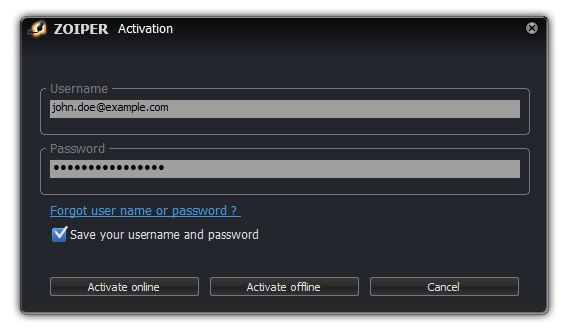
Activate online
If your estimator is continued to the Internet, yous can activate your re-create of Zoiper automatically by clicking on the Activate online button. Zoiper will contact our licensing server and download the needed license files.
If your figurer requires the utilise of a manually configured proxy server, zoiper will automatically use the proxy settings used for internet explorer.
Activate offline
If your computer is non connected to the Internet or a firewall is blocking access to our licensing server, the "Activate offline" - push can be used. Clicking on the push volition generate a file that contains some details that are unique for your calculator and the version of Zoiper that you are trying to register. The filename contains the name of your computer. It will wait like this:
ZoiperCOMPUTERNAME.certificate
It can be establish in the Zoiper Certificates folder.
You can find it in:
C:\ProgramData\Zoiper
Zoiper<ComputerName>.document is the file that should be sent to register4@shop.zoiper.com
Please open your mail customer and press the "Compose new mail" push button. Address the new mail service to register4@shop.zoiper.com and adhere the ZoiperCOMPUTERNAME.certificate file.
You will receive a document file by mail service in render.
Please brand sure that yous are saving information technology named:
document
No file extension is needed.
Continue in mind that by default Windows hides the known file extensions and in that location is a loftier possibility that your Windows automatically puts a file extension to the certificate file while saving it.
Please right click on that file and choose "Properties". You volition run into the full filename in the Properties window. You might need to remove the extension to make it work.
This file (certificate) should be placed in the folder you got ZoiperCOMPUTERNAME.certificate from.
Restart the phone, it should at present exist activated.
Silent installers for mass deployments.
If you would similar to install Zoiper without the need for user interaction, simply with a progress indicator, use these control line options to the zoiper installer. (You volition need to adjust the name based on the installer yous are using).
"zoiper_Biz_3.1_setup.exe" --mode unattended --unattendedmodeui minimal
Activation errors
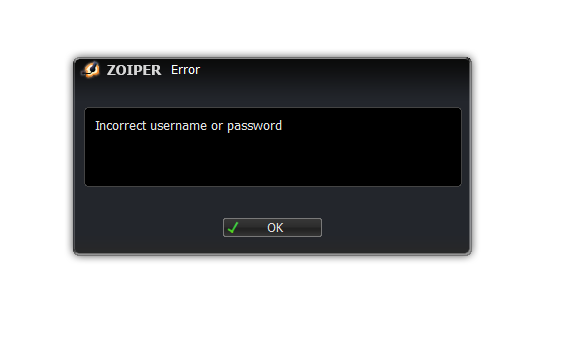
In case the username and or countersign is incorrect, an error message will be shown and the application will exit. Please restart the application and try once again.
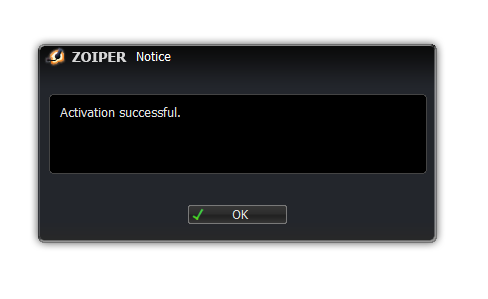
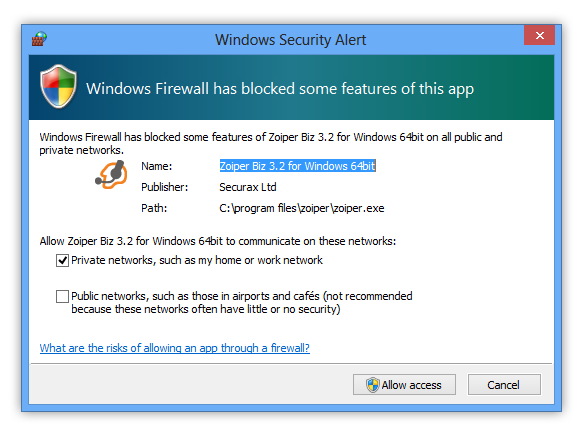
If all went fine, this detect should appear, you are at present ready to use the awarding
Please confirm that Zoiper is allowed to accept incoming network connections.
Configure Microphone and Speaker
Zoiper comes with a born Audio Wizard for piece of cake configuration of your microphone and Speaker.
You may access this Sound Wizard by:
- Clicking on the speaker icon on the bottom correct
- Clicking on the Settings menu in Zoiper and selecting Sound Sorcerer
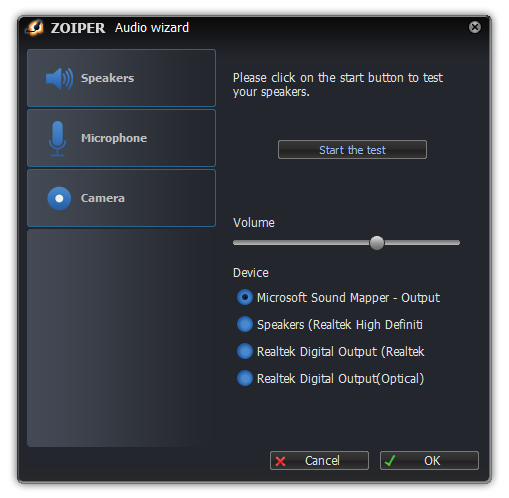
Zoiper will configure your Speakers offset.
Click on the "start the examination" – push.

If your speakers are configured and connected properly, you lot should hear a ringing audio. If you exercise, please click on the Yes button and move on to the Microphone step.
If no ringing sound was heard, please brand sure your speakers are connected properly and powered on and if needed modify the selected audio device on the bottom of the page to a dissimilar one and endeavor again by clicking on the "no" – button.
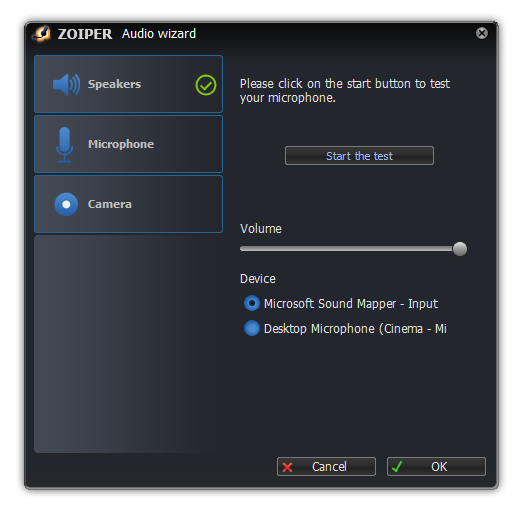
Click on the "Test your microphone" – push button to showtime recording your voice.
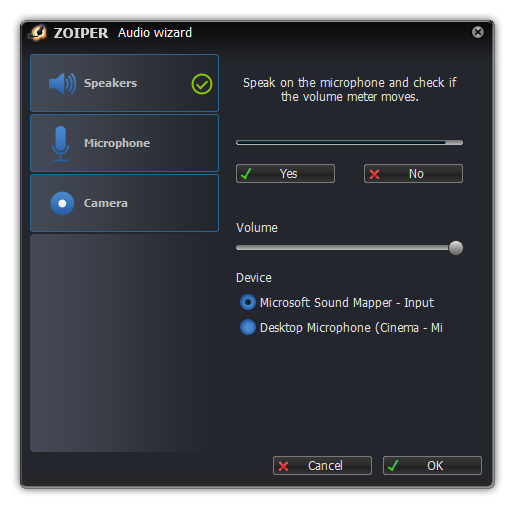
If the selected microphone is connected properly, you should see the book meter motility when speaking into the microphone. If the volume meter is non moving, please cheque your cabling and make certain the proper audio device is selected in the Device section on the lesser of the folio.
Once the microphone and speaker are configured properly, click on the "yes" - and the "ok" to move on to the webcam configuration screen.
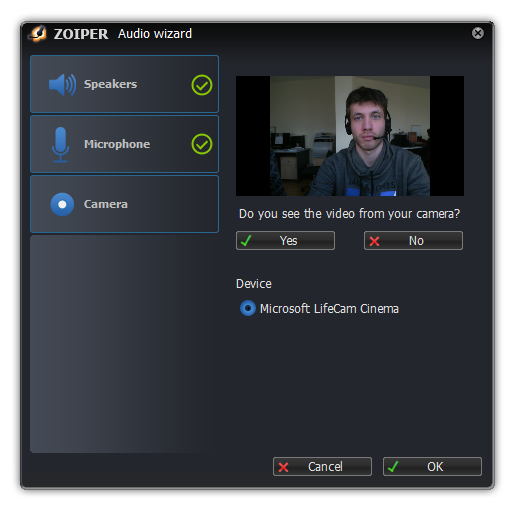
A list with webcams volition appear on the bottom. Please select the webcam to use and confirm that the prototype is shown by clicking on all the same. If no webcams announced, please make sure that your webcam and webcam drivers are properly installed in windows.
Clicking on ok volition close the configuration panel.
Configuring a SIP, IAX or XMPP account
At present that the audio devices are configured, information technology is time to move on to the configuration of the server you want to use. This could exist a VoIP provider, your role PBX or a public XMPP provider such equally Facebook.
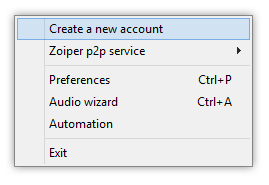
Click on the Settings menu and select "create a new account".
Account Blazon
A new folio will appear to select the blazon of account you lot want to make. This volition usually be SIP, unless your VoIP provider or system administrator instructed you otherwise
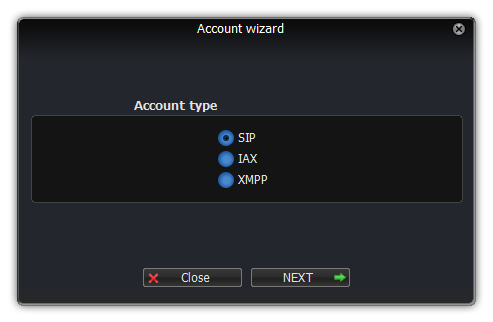
Select the type of business relationship yous want to configure and click on the "Next" – button.
Tip: Delight visit http://oem.zoiper.com for more data on how to make things easier for your users by providing them with a preconfigured or preprovisioned Zoiper. This will featherbed all tedious configuration tasks for the end user and will allow the user to make calls immediately after the installation.
Credentials
Your provider or arrangement administrator should have provided you with a username, countersign and perhaps a hostname.
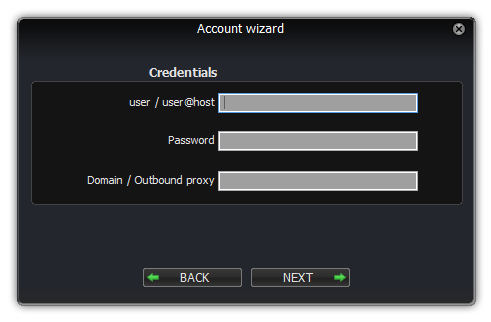
Make full in the username on the start line and the countersign on the 2d line.
If your administrator provider you lot with a domain, proxy, registrar, hostname, outbound proxy or server field, please fill enter it on the last line.
Fill in the username on the first line and the password on the second line. The username could look like:
john.doe
or:
john.doe@sip.example.com
or:
john.doe@sip.example.com:5060
or:
abc123cde
The password volition typically exist a random string, usually with a combination of lowercase and uppercase characters and some number like:
dHOE5NBjqmS3
This field will typically await like:
sip.example.com
or:
sip.case.com:5060
or in case of a PBX might look like:
192.168.1.twenty
Account name
Please enter a proper name to place this business relationship; yous are free to requite it any name of your liking.
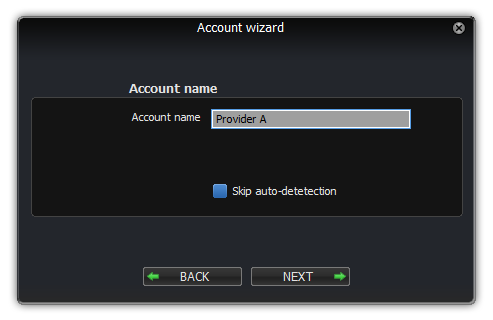
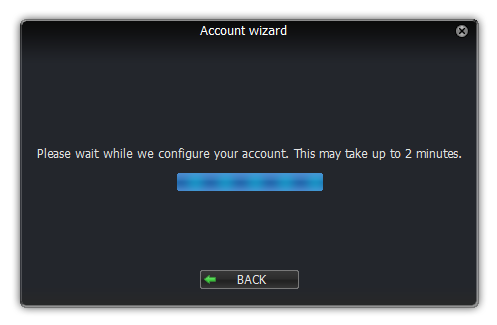
When you are done, click on the "next" – button. Zoiper will now effort to figure out the best way to connect to the VOIP server.
Troubleshooting
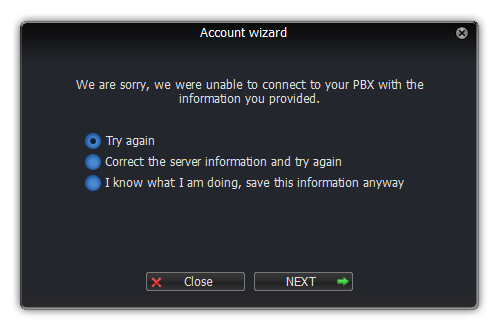
In case the business relationship wizard is unable to automatically configure your account, this could be due to a variety of reasons.
Most mutual reasons are:
- The server hostname does not exist or is wrong.
- The username or password is incorrect.
- The server is not responding or a firewall is blocking the admission.
- The business relationship needs additional configuration to register
Please verify the information y'all have entered and try over again.
If y'all are sure the information are right and want to save the information and want to complete the configuration manually, click on "I know what I am doing, salvage this information anyway".
Run into also Preferences -> Accounts.
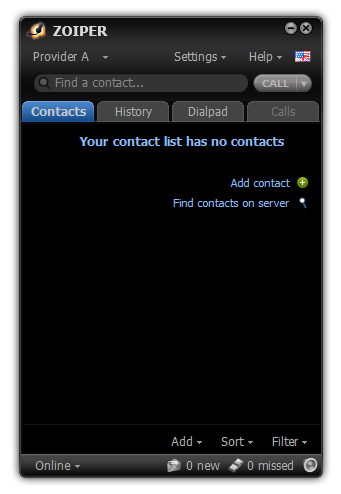
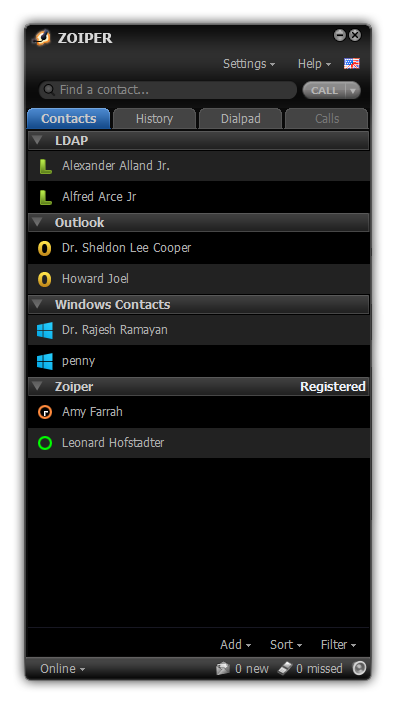
Zoiper is designed to make communications easier and more intuitive. It is a powerful tool that combines voice, video and instant messaging in one.
The film above shows the basic overview of the Zoiper interface.
The menu bar consists of the Account dropdown, Settings menu, the Help menu and the language selector.
Account dropdown

The account dropdown is simply present when ii or more sip or iax2 accounts have been configured. Changing the selected provider changes the default account used for the outgoing calls.
This selection has no effect on instant letters or contacts with a hardcoded business relationship.

The settings carte du jour let'southward you access the Business relationship Wizard, the Zoiper p2p service, the preferences bill of fare, the Audio Wizard and the Automation bill of fare.
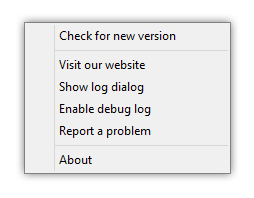
Hither you tin can check for the latest version of Zoiper; the manual; visit our website; show the quick logs, about box; the transmission, enable or disable the debug log; study a trouble to the Zoiper team or read the about box.
This dropdown lets you change the language. Contact u.s.a. on back up@zoiper.com if you would like to interpret Zoiper in your linguistic communication.
Search / Input field
This field can be used to
- Dial the number entered in this field
- Search for this name or number in the contact listing(south)
Using the search functionality
A search may be made for phone numbers / extensions, digits or messages for names of contacts. For case, the overview prototype shows a search for the outset 3 messages of the proper name Peter.
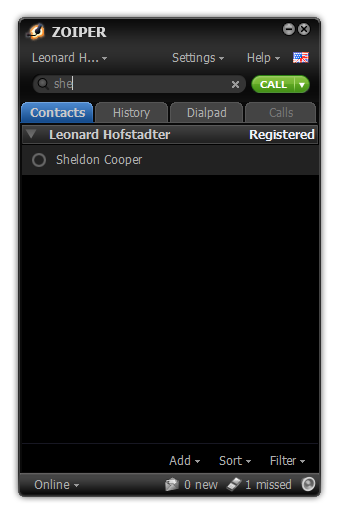
Typing in just the first syllable (i.east. 'pe') is enough to instantly bring all results that contain this sequence of letters. With each letter typed, the search is narrowed down to the right contact. Yous do not need to type the entire name: click on the chosen contact when the results are filtered out to just a few – give him / her a telephone call by clicking on the call push, or transport a Fax, or kickoff an Instant Messaging session using the functional buttons.
Note that you may perform a similar search with the matching digits of a telephone number.
It is possible to as well search LDAP or the native contact and amass the results in the contact list. See the tutorial for using LDAP with Zoiper.
Using the Dial functionality
You lot may enter any phone number / extension to brand a VoIP phone call. Just type information technology in the field and click the "Call" - button, or hit enter to dial.
Call and hang-upward buttons
These buttons provide the basic phone functionality of Zoiper. Both buttons are gray and disabled by default.
When you type something in the Search / Input field or click on a chosen contact, it becomes green.
The "Call" – push is used for dialing phone numbers / extensions. It becomes enabled (green) when you:
- Click on a contact;
- Blazon a contact name to call in the search / input field
- Blazon the telephone number / extension in the search / input field
On the right side of the call button you may find a dropdown to send a fax or start an instant messaging conversation instead of an ordinary call.
The "Hang-up" - push button is to the right of the "Call" – button. Information technology becomes red while dialing or in the middle of an active call.
The tab bar and tabbed windows
The tabbed windows feature provides convenient access to all functionalities. The tab windows are accessible via the Tab-bar located beneath the Phone call and Hang-upwardly buttons.
The four tabs bring the relevant windows: Contacts, History, Dial pad and Active calls to the foreground.
All these windows are dockable. This ways that you can drag them away from the principal Zoiper window. This is specially useful if you lot desire to, for case, browse your Contact list and take your Punch pad on display at the aforementioned time.
Contact tab
The contact tab shows a list with all contacts or, if a search is active, all contacts that result from the search query in the search field,
Regardless if they were found in the Zoiper contact list, in the native accost book, the outlook contacts, on an external XCAP server or in the XMPP roster or the LDAP directory.
The contacts are ordered in subgroups, with a small triangle next to their name that allows the user to hide or testify the contacts for a given group.
Clicking on a contact results in the contact field expanding to reveal more details and options, while at the same time enabling the green call push.
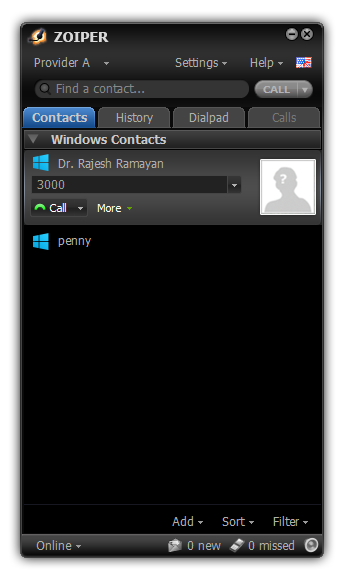
If multiple numbers are bachelor for a contact, a dropdown will appear on the right of the telephone number, giving access to all other numbers for that contact.
The minor call button underneath lets you punch the contact, while the small dropdown triangle reveals boosted options such every bit The "More than"-push on the right, lets you edit the contact (if it is in the Zoiper contact listing and not in an external contact source) or re-create the contact to the clipboard.
On the lesser of the tab there is a contact card, to speedily add or import a contact from LDAP or the native address book. The Sort button lets y'all sort the people based on their name or their online status. The filter push allows filtering out the offline people.
Entering a few characters in the search field will filter the results shown beneath, just similar in the contacts list tab.
History tab
You lot can open up this tab by clicking on it.
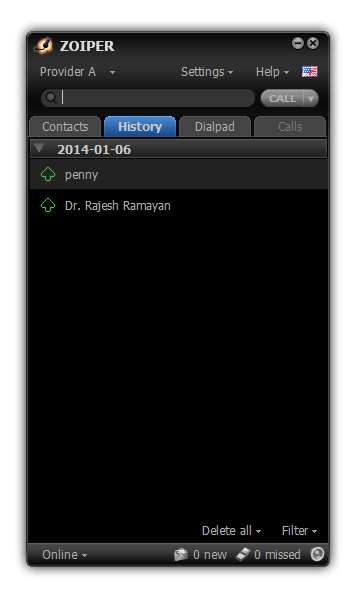
The history tab shows a list with the history of calls and faxes exchanged, In a way very similar to the contact list tab.
The events are listed consecutively with appointment and time for each effect.
The history stores the information about events such every bit:
- Incoming calls
- Approachable calls
- Missed calls
- Incoming faxes
- Outgoing faxes
- Unanswered calls
- Rejected calls
If you have missed a phone call, you may punch back the caller right abroad. You may observe the length of calls or the contents of messages. History likewise allows you to bring up faxes received, if you lot similar to.
When Zoiper is restarted, the History from previous sessions is still present. The previous Zoiper session (from launch to Zoiper shutdown) is saved in a History.txt text file, this file is located in the %appdata% folder, in the Zoiper subdirectory.
Each new History is listed underneath the previous one co-ordinate to its date and time.
Clicking on a contact shows more details and options.
On the bottom of the tab, a delete push lets you delete the complete history at once, the filter button allows filtering of the contacts based on the call's release / hangup reason and if it was an incoming or outgoing call.
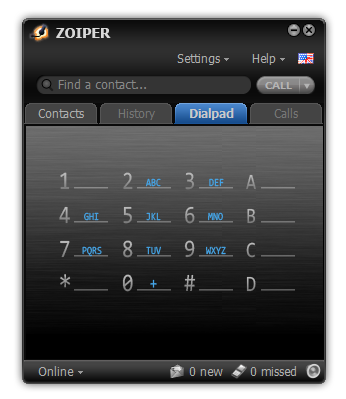
Dialpad
Clicking on the punch pad opens upward a traditional dialpad, to either punch a number or to navigate an IVR through DTMF tones.
Active call tab
When you lot starting time a phone call, the active call tab will get active.
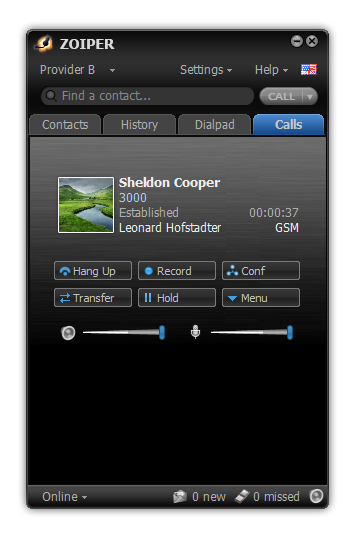
The dialed number (and name if available) are shown on the top, together with additional data on the call such as current status (Ringing, Established), the account used, the duration of the call and the codec used.
Underneath a serial of action buttons will appear:
| Hangup | To hangup the call |
|---|---|
| Record | This volition first a call recording on the fly. The recordings will be stored in the location configured in the preferences. (Add a shortcut to this setting in the manual). When active the text on the button volition change into Finish. Delight note: it is possible to always enable recordings in the settings. |
| Conf | Add together this telephone call to a conference call. All calls in the briefing will announced in a list on the bottom. 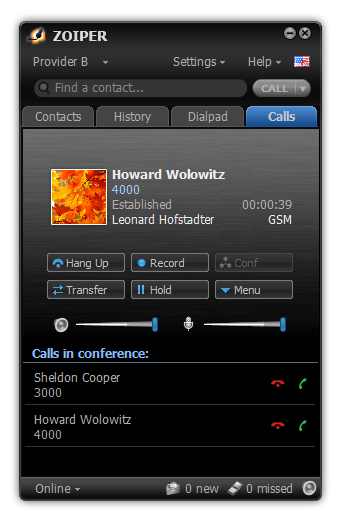 Clicking on the red hangup icon will hangup the call with the person. |
| Transfer | Open the transfer dialog. 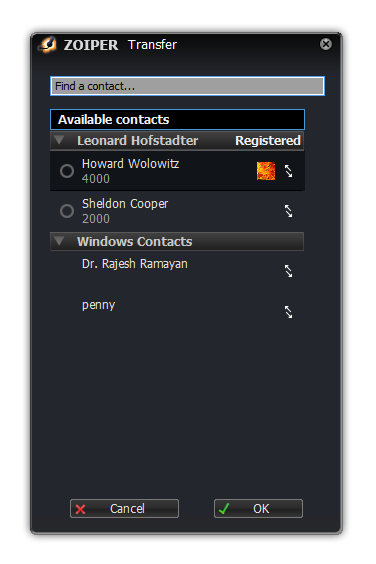 You can transfer the phone call to the person in the listing by clicking on the transfer button on the right of the name. Keep in mind that information technology is only possible to transfer to people on the same server and the server y'all are connecting to needs to have transfer support activated. |
| Agree | Agree the call, this will crusade music on agree to be played from the server to the recipient. (if configured on the server).  |
| Bill of fare | Opens a carte du jour with additional options. Two volume sliders volition appear on the lesser, the left one is for the speaker. Clicking on the speaker will silence the speaker, sliding volition adjust the volume. The microphone slider is adjusted automatically past default to automatically select the optimal microphone volume. Y'all tin can disable this behaviour in the settings, althoug information technology is not recommended. Muting the microphone tin can be done by clicking on the microphone icon. |
Bottom Bar
On the bottom of the phone, a small carte is bachelor with piece of cake admission for irresolute the online status, checking voicemail messages, showing missed calls, audio device selection and the sound wizard.

Online condition
This is an indicator of the online condition of your electric current account. The people that have added you lot in their contact lists may view your online status likewise. Choose the status that suits you best.
In order to change the current condition, you may:
- Choose the online status you lot wish to use from the Online condition button and click on it.
- Go to the settings > Zoiper p2p > condition and click on the status you desire to brandish.

Changing the status will bear upon all configured SIP and XMPP accounts with the "publish presence" selection enabled in the settings. When on an active call, the status will automatically be changed to "on the telephone".
Voicemail messages
The message-waiting indicator will lite up when you take new voice messages. This requires the back up for MWI by your PBX or VoIP provider.
Clicking on the voicemail icon will dial the voicemail extension that was configured for that business relationship.
You can configure the MWI in Settings > Preferences > { SIP business relationship } > avant-garde > Subscribe for MWI. Refer to this link for more than information.
Missed calls
The missed calls indicator will light up when y'all accept missed calls, a counter on the right will inform you how many yous missed.
Clicking on the icon will take you to the history tab, with the missed calls pre-filtered.
Audio icon
The audio icon provides a quick manner to change the audio device or beginning the audio wizard.
You can access the Zoiper Preferences window, by either:
- Clicking on the Settings card and clicking on preferences;
- Pressing CTRL+P on your keyboard while Zoiper has the focus.
In all cases the Zoiper Options screen will pop upwardly with these sections:
Accounts
If you take 1 or more accounts, you lot volition see them heed in the left column on the accounts page.
The accounts are grouped past protocol. (SIP, IAX, XMPP), an icon in front end of the business relationship informs yous of the current status: registered, failed to register or non registered.
When yous click on an account, settings for this specific business relationship will open. What settings volition be shown depends on the protocol type. (SIP, IAX or XMPP).
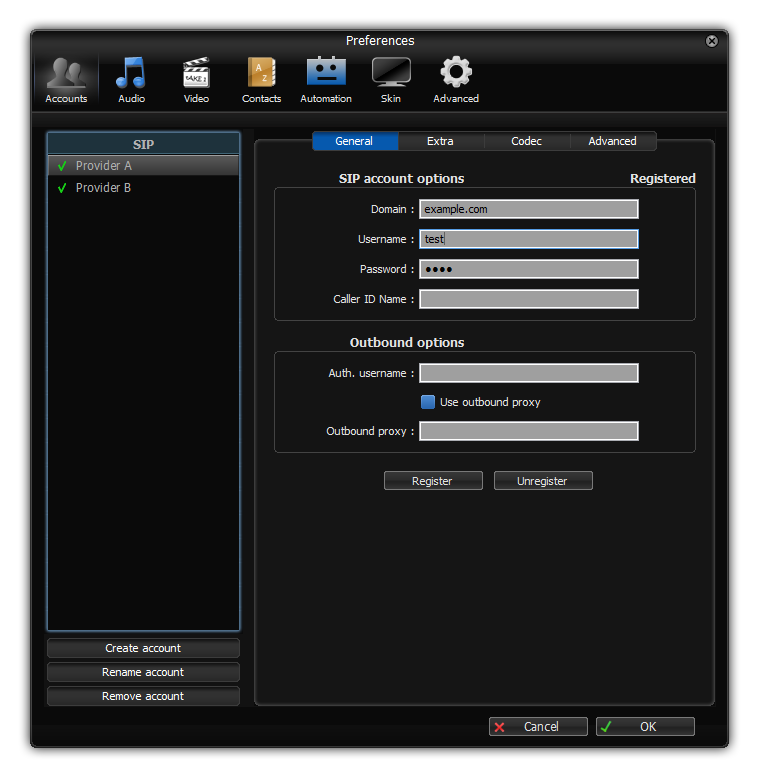
SIP Accounts
General
Sip Business relationship options
| Domain | This is the hostname or ip address where the server is located. You can add a port past adding :<portnumber> add the finish, past default port 5060 is used. eastward.grand. sip.example.com:5060. Zoiper supports DNS SRV and NAPTR as specified in the relevant RFCs. |
|---|---|
| Username | The username needed to authenticate to the server. |
| Countersign | The password associated with this account Caller id name: This an optional field where you can change the callerid for your approachable calls. Usually this option will take little effect, most providers and servers will disregard changes to the callerid to avoid call spoofing. |
Outbound options:
| Auth. Username | This is the (optional) authentication username required by some server configurations. |
|---|---|
| Utilise outbound proxy | This checkbox makes sure that Zoiper will utilise the outbound proxy configured on the line below. On the bottom of the page, you lot will discover a annals and unregister button, this button allows yous to chop-chop register or unregister an account on the server. |
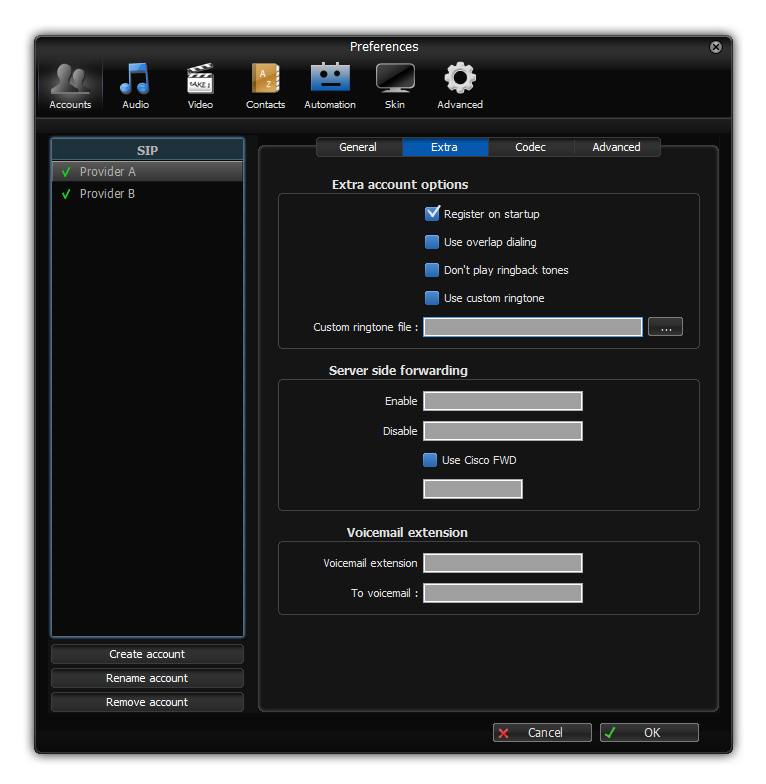
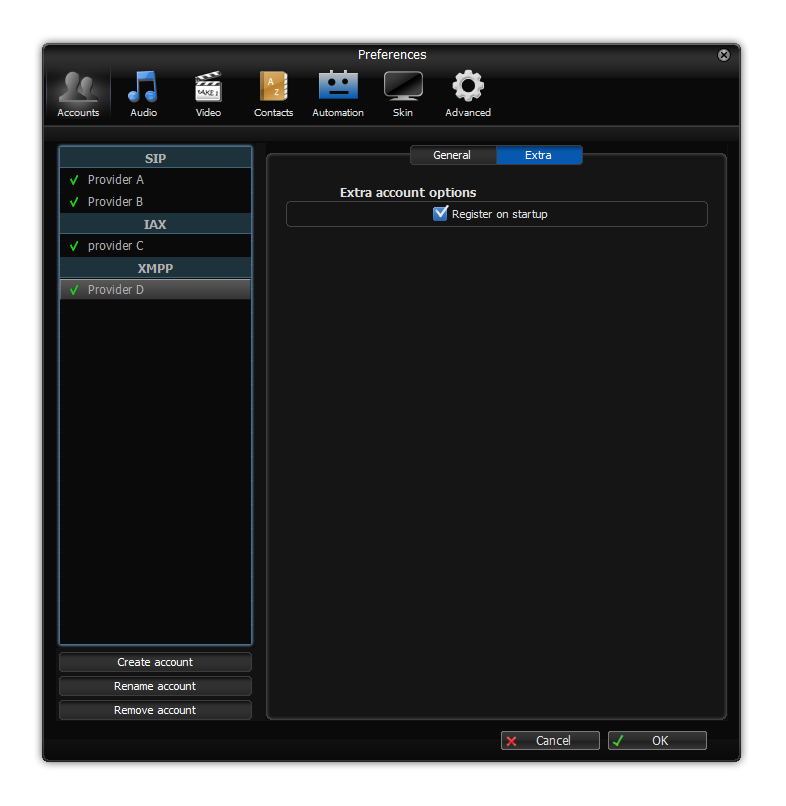
Extra account options
| Register on startup | When checked, this account will annals when Zoiper launches. |
|---|---|
| Use overlap dialing | When ticked, Zoiper will not ship the complete number to punch at one time, simply will send them to the server digit by digit. |
| Don't play ring back tones | This setting volition stop local generation of ring back tones and playback of early media when you are dialing somebody and the call is in the ringing land. This setting is usually used for call centers. |
| Use custom ringtone | This checkbox and the field underneath let y'all activate and configure an alternative ringtone to be used for incoming calls on this business relationship. Clicking on the " …" – push will open up a file browser to select the file you want to apply. This file needs to be an 8kHz, sixteen-bit Mono wave file. (.wav) |
| Server side forwarding | The enable and disable fields are used to configure two extensions on the server that tin be dialed to activate or deactivate the call forwarding. |
| Cisco FWD | The utilize Cisco FWD and field underneath are used to enable the cisco server side style of callforwarding. This option will only piece of work if you configure the phone type on the Cisco Callmanager every bit Cisco Softphone instead of the standard 3rd party sip softphone. |
| Voicemail extension | This is the extension on the server where you tin can listen to your voicemails. This extension will be dialed when you click on the voicemail icon on the master console. |
| To Voicemail | This is the extension on your server that hosts the voicemail functionality. This is used to frontwards incoming calls to the voicemail when you click on the ship to voicemail button on the incoming telephone call popup. |
Codec

On this folio you can select ane or more codecs to be used for this account.
The available codecs shows the unselected codecs, when you select them and click on the correct point arrow, they will be added to the selected codecs.
Using the up and downwards arrow in the selected codecs column, will change the priority of the codec, the higher in the listing, the higher the priority.
Keep in mind that the codec that ends upwards existence used volition be negotiated between zoiper and the other cease, from the list of codecs bachelor on both sides.
Advanced
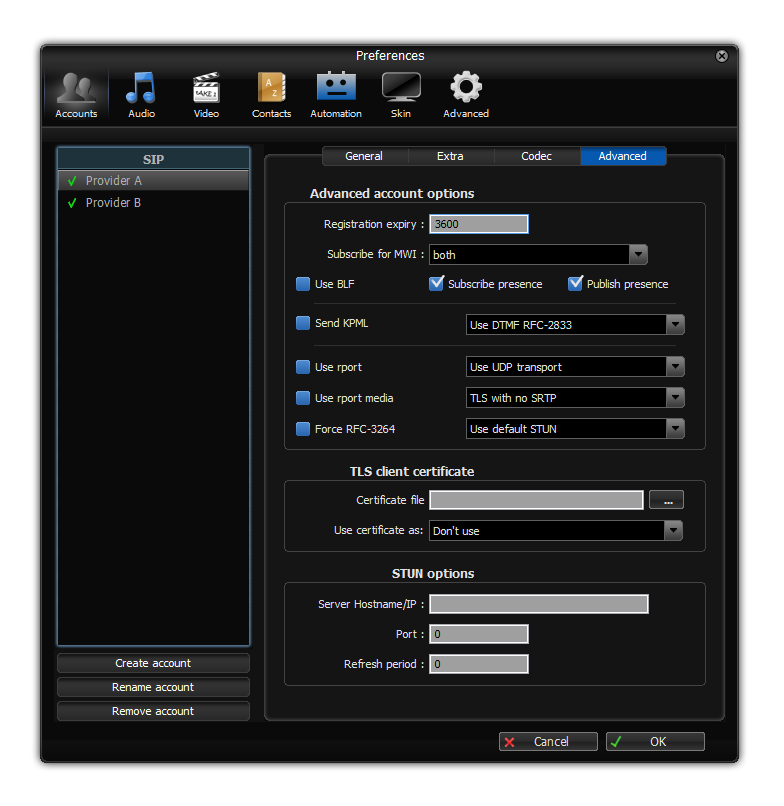
Advanced account options
| Registration death | The maximum number of seconds between consecutive registrations on the server. Zoiper will register x% earlier than configured to account for network delays and retransmissions. The registration procedure is used to inform the server of our location to make sure incoming calls volition arrive properly. Registration is sometimes as well required by the server to make outgoing calls. |
|---|---|
| Subscribe for MWI | A dropdown to allow yous configure the use of Bulletin Waiting Indicators. This pick is needed to show the number of voicemails on the server on the main console, next to the voicemail icon. Possible options are:
Some servers will pass up the registration or the use of MWI based on the order of the packets sent. |
| Utilize BLF | This checkbox enabled the Busy Lamp Field functionality. When an extension with BLF configured is decorated, you will exist able to run across information technology's presence status as busy in the contacts listing. |
| Subscribe presence | Checking this box volition cause Zoiper to subscribe for presence updates from the people on its contact list. |
| Publish presence | Checking this box volition cause Zoiper to kickoff sending it's presence updates to the people on information technology's contact list. |
| Transport KPML | Enable this option to employ KPML If the server confirms it supports information technology. This is mainly used in combination with Cisco Callmanager and will supplant the other DTMF capabilities. |
| Employ DTMF | This configures which method will be used to ship DTMF tones to the server when a button is pressed on the Punch Pad. The default setting is to use RFC-2833, which means sending them every bit a special blazon of RTP packets. Alternate options are to send them with a SIP info message, or send them inband equally an RTP audio parcel. This last method is very unreliable and incompatible with voice compression; it will only work when using the uLaw or aLaw codecs. Do non utilise inband unless the server or providers provides you no other selection. |
| Utilise rport | Nat handling based on the rport RFC. Recommended for TCP and TLS configurations. |
| Apply rport media | Concluding resort for NAT related missing sound for some broken implementations (east.g. when the client is behind a symmetric nat in combination with a CUCM server). Use with circumspection and merely if needed. |
| Transport | This dropdown lets you select betwixt UDP, TCP and encrypted TLS for the signaling betwixt the server and the softphone. UDP is the well-nigh uniform setting. |
| SRTP | This dropdown lets you lot enable or disable SRTP. SRTP will only work if used in combination when the encrypted signaling (TLS) is configured in the dropdown higher up. |
| Forcefulness RFC-3264 | This forcefulness a change in the hold and unhold packets and is a workaround for some broken implementations that practise not annunciate the supported concur methods properly. Employ this when experiencing issues putting a telephone call on hold and you ostend NAT is not to arraign. |
| STUN | This dropdown permit's yous select the stun server you desire to use, if any. The default stun server is stun.zoiper.com, If you use the custom stun option, you will demand to fill it in at the lesser of the page in the stun options section. |
| User document | This is the path to the user document used for TLS SIP connections (rarely used). |
| Stun options | This setting lets you configure a custom stun server and port every bit well as how often the stun will be refreshed. |
IAX Accounts
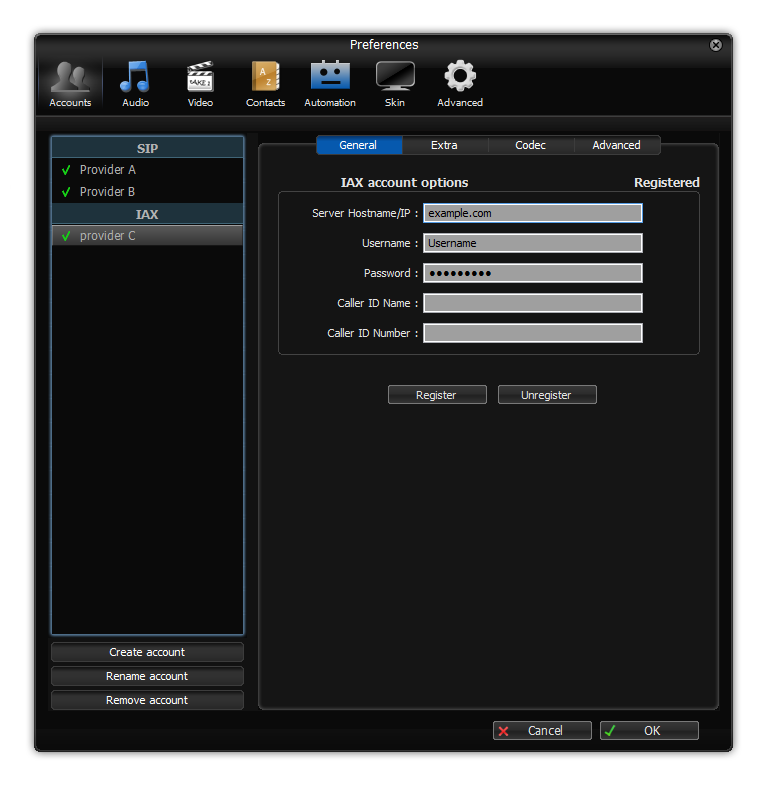
General
IAX Account options
| Server Hostname/IP | The hostname or IP address of the VoIP server. |
|---|---|
| Username | The username needed to authenticate to the server. |
| Countersign | The countersign associated with this business relationship Caller id name: This an optional field where you tin can change the callerid for your outgoing calls. Ordinarily this option will have little outcome, most providers and servers will condone changes to the callerid to avoid call spoofing. |
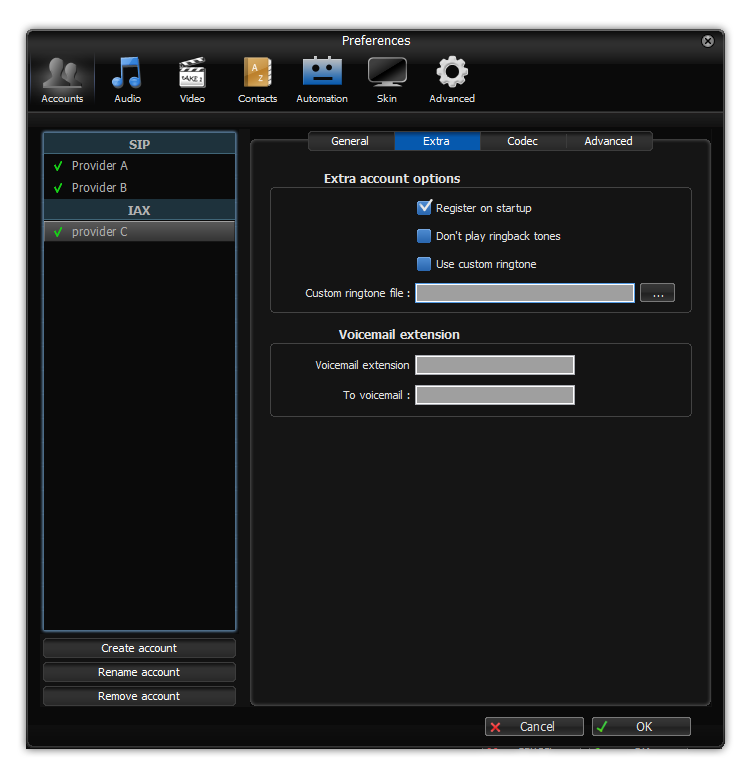
Extra business relationship options
| Register on startup | When checked, this account volition register when Zoiper launches. |
|---|---|
| Don't play ring dorsum tones | This setting will stop local generation of band dorsum tones and playback of early media when you are dialing somebody and the call is in the ringing state. This setting is usually used for call centers. |
| Use custom ringtone | This checkbox and the field underneath allow you activate and configure an alternative ringtone to be used for incoming calls on this account. Clicking on the " …" – button will open a file browser to select the file you desire to apply. This file needs to be an 8kHz, 16-bit Mono wave file. (.wav) |
| Voicemail extension | This is the extension on the server where you can listen to your voicemails. This extension will be dialed when you click on the voicemail icon on the main panel. |
| To Voicemail | This is the extension on your server that hosts the voicemail functionality. This is used to forward incoming calls to the voicemail when you click on the ship to voicemail button on the incoming phone call popup. |
Codec
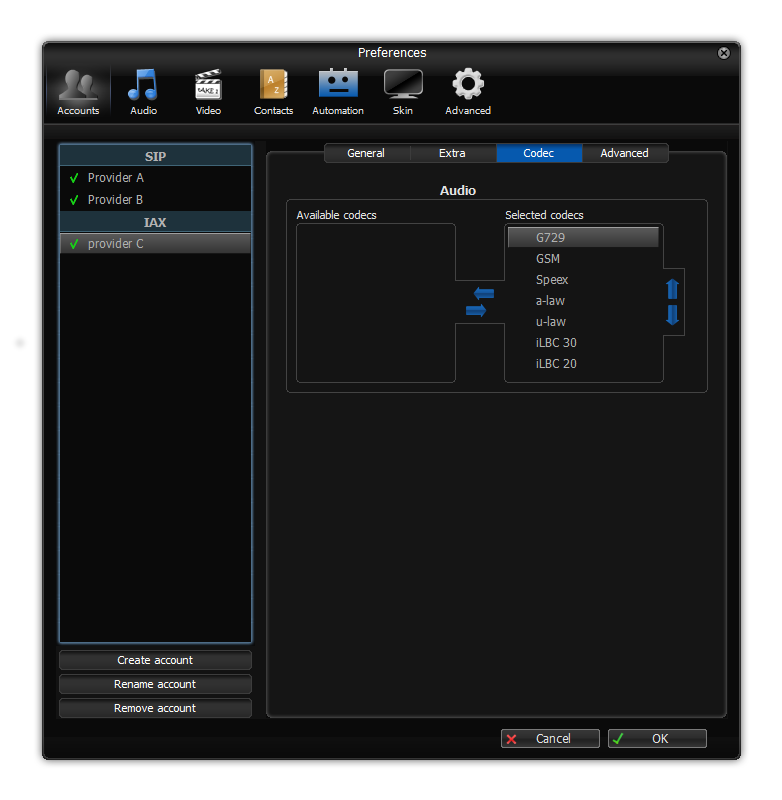
On this page you lot tin select one or more than codecs to exist used for this business relationship.
The available codecs shows the unselected codecs, when yous select them and click on the correct betoken arrow, they will be added to the selected codecs.
Using the up and down arrow in the selected codecs column, will change the priority of the codec, the higher in the list, the college the priority.
Proceed in listen that the codec that ends up existence used will be negotiated between zoiper and the other terminate, from the listing of codecs available on both sides.
Advanced
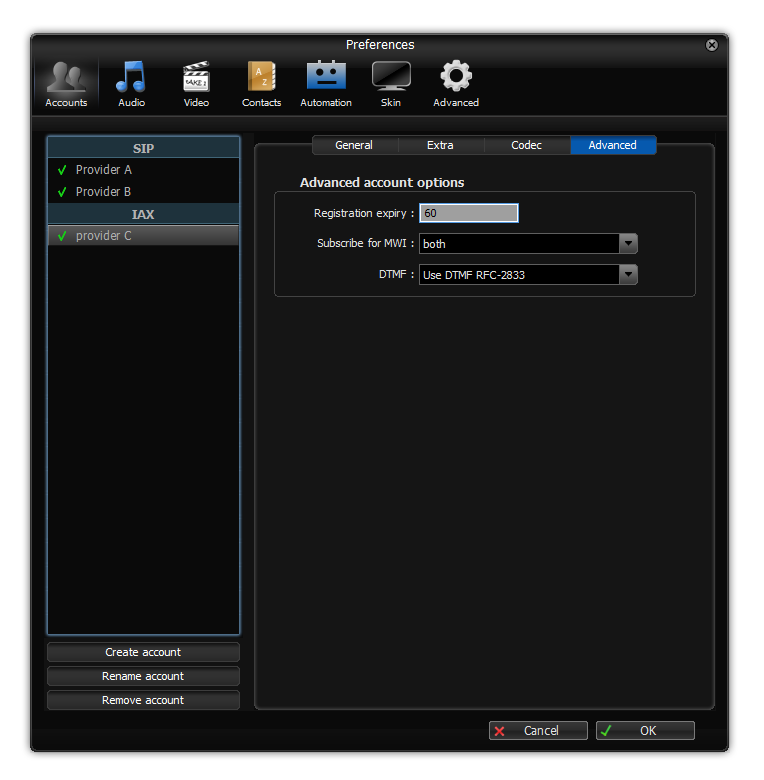
Advanced business relationship options
| Registration expiry | The maximum number of seconds betwixt consecutive registrations on the server. Zoiper volition register 10% earlier than configured to account for network delays and retransmissions. The registration procedure is used to inform the server of our location to make sure incoming calls will arrive properly. Registration is sometimes besides required by the server to brand outgoing calls. |
|---|---|
| Subscribe for MWI | A dropdown to let you configure the use of Message Waiting Indicators. This option is needed to evidence the number of voicemails on the server on the main console, side by side to the voicemail icon. Possible options are:
Some servers will refuse the registration or the use of MWI based on the guild of the packets sent. |
| Use DTMF | This configures which method will exist used to ship DTMF tones to the server when a push button is pressed on the Dial Pad. The default setting is to use RFC-2833, which means sending them as a special type of RTP packets. Alternating options are to send them with a SIP info bulletin, or send them inband as an RTP audio packet. This last method is very unreliable and incompatible with voice compression; information technology will only piece of work when using the uLaw or aLaw codecs. Do non use inband unless the server or providers provides you no other choice. |
XMPP Accounts

Full general
XMPP Account options
| Jabber ID (JID): | TODO |
|---|---|
| Countersign | The password associated with this account Caller id name: This an optional field where you can modify the callerid for your outgoing calls. Usually this option volition have little effect, virtually providers and servers will condone changes to the callerid to avoid call spoofing. |
| Full name | TODO |
| Connect server (opt) | TODO |
| Utilise legacy TLS way | TODO |
Extra account options
| Register on startup | When checked, this business relationship will annals when Zoiper launches. |
|---|
Audio
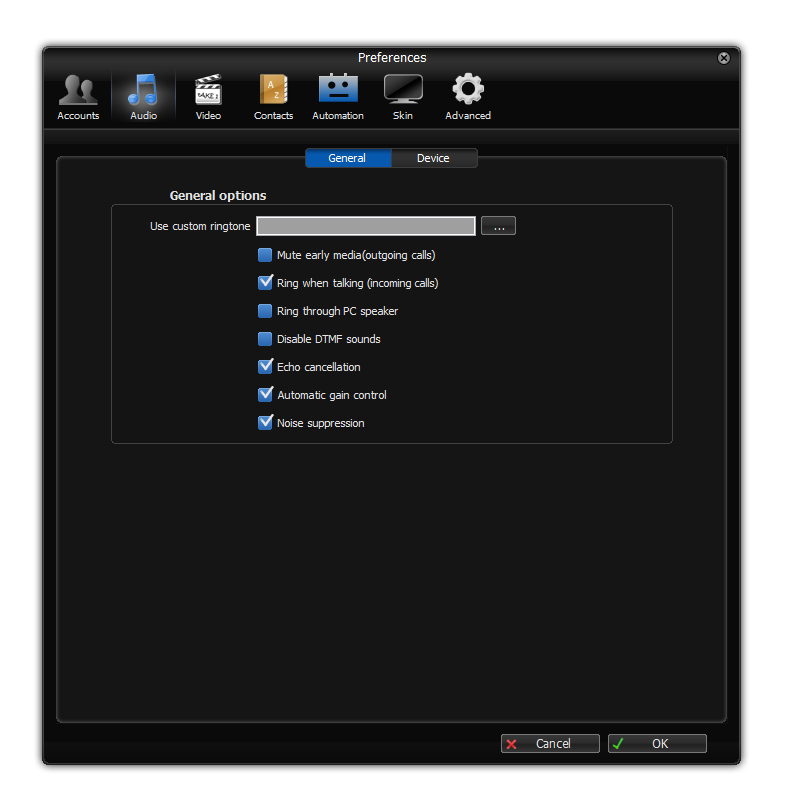
General tab
| Custom ringtone | Hither yous may select a custom ringtone for all accounts. If you want a specific ringtone for but 1 business relationship, you can alter this in the accounts > {account name } > extra . |
|---|---|
| Mute early media | This enables the muting of early on media. This includes ring dorsum tones coming from the network or service announcements such as merely non limited to "this number is not in use". |
| Ring when talking | If you unselect this checkbox, the softphone will no longer make a ringing audio when you are already on the phone and a second telephone call comes in. |
| Ring through pc speaker | This option is commonly used for situations where the user is sometimes wearing a headset, simply wants to hear the ringing sound through the PC speaker in case he or she is not wearing the headset when the telephone call comes in. |
| Disable DTMF sounds | Activate this option if you desire to cease the phone from playing sounds when you press the punch pad buttons. This has no upshot on the DTMF being sent to the server, it only stops the local playback of the same tones to the user of the softphone. |
| Echo counterfoil | This volition reduce or eliminate the echo that person you are calling might hear. It is recommended to keep this functionality enabled at all times, unless you are using a desk-bound speaker phone with built in echo cancellation. Please go on in listen that it is technically incommunicable to stop the echo coming from the other stop. If y'all hear an echo when using Zoiper, the other side needs to employ amend echo cancellation. |
| Automatic Gain Control | This will control the microphone levels automatically to make sure your voice is ever the proper volume, regardless of what microphone you employ or slight changes in the distance to the microphone. It is recommended to get out this enabled at all times. |
| Noise Suppression | Noise suppression is used to eliminate abrasive background racket from being sent over the network. |
Device tab
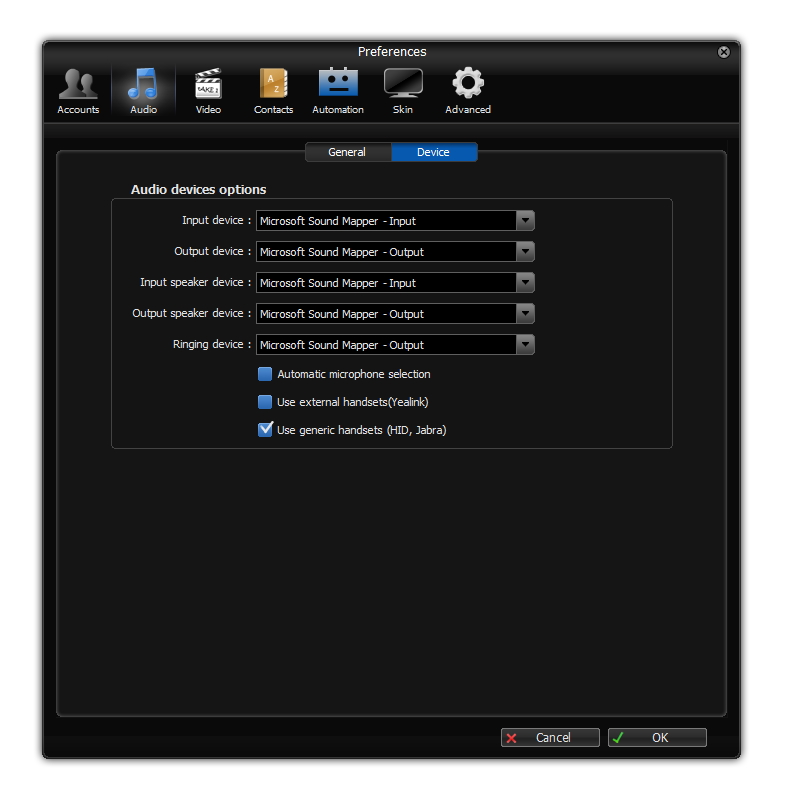
This tab lets you select and configure different audio devices.
| Input device | This is the default microphone. If you have more than one microphone, yous can select the proper device by clicking on the dropdown. |
|---|---|
| Output device | This is the default speaker. If you take more than than 1 speaker, you tin select the desired one by clicking on the dropdown. The adjacent two options are for the "speakerphone" contour. You can switch betwixt the headset contour and the speakerphone contour by clicking on the speakerphone icon on the bottom correct on the primary Zoiper window. |
| Input Speaker Device | This is a dissever sound contour. The device you select here will be treated as the device for the microphone when the "speaker phone" – mode is active. |
| Output Speaker Device | This is a separate audio contour. The device you select here will exist treated as the device for the speaker when the "speaker phone" – mode is active. |
Contacts
Search tab
This tab is for configuring how the search works in the contact list tab.
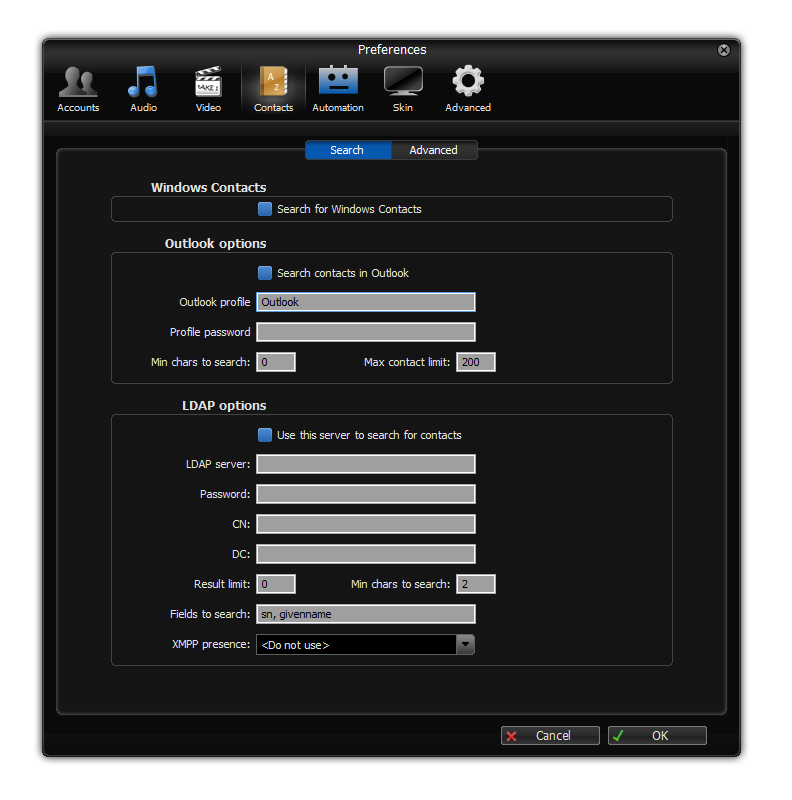
LDAP options
Y'all tin can activate the LDAP search past checking the box in front of "apply this server to search for contacts".
| LDAP server | This is the hostname or ip accost where the LDAP server is located. |
|---|---|
| Password | This is the password needed to access the server. |
| CN | Common proper name |
| DC | Domain Component |
| Result limit | If you lot have a very big LDAP database with thousands of entries, you most likely volition want to put a limit on the number of results to avoid the server or the softphone from getting overloaded. |
| Min. chars to search | This is the minimum number of characters that volition demand to be typed in the search bar before a search will be started. This can also be used to reduce the load on the server or the softphone in case of big LDAP directories. |
| Fields to search | These are the fields to search for the string that was entered in the search field. By default this is "sn, givenname". |
| XMPP Presence | The name of the field in the LDAP points to the XMPP presence URI for the contact |
Advanced
Contact server options
Save contact list on Zoiper Biz server: This will save all your contacts on the Zoiper servers. This requires you to be logged in to the zoiper service.
Salvage local contact list: This will save your contact listing on the local filesystem
Save on this xcap server: This will save your contact list on the xcap server that is configured below.
| XCAP root | http://xcapexample.com/xcap-root |
|---|---|
| XCAP user | 1234@xcap.example.com |
| Username | the username for the XCAP server |
| Countersign | the countersign for the XCAP server |
Automation
General
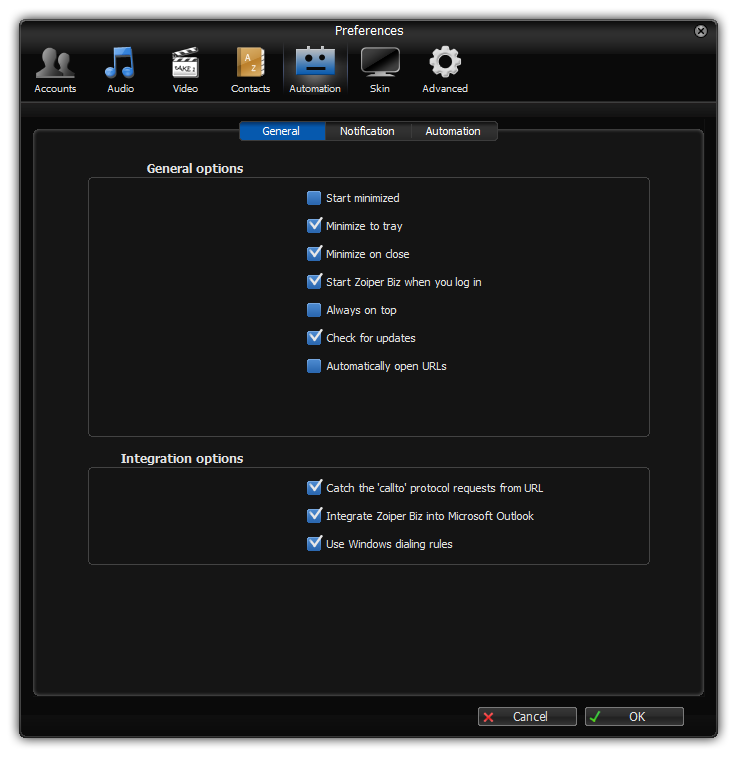
| Start minimized | When this option is selected, Zoiper will automatically minimize on startup. |
|---|---|
| Minimize to tray | When this selection is selected, Zoiper will minimize to the tray instead of to the taskbar. |
| Minimize on close | When this selection is selected, closing Zoiper volition issue in Zoiper minimizing to the tray instead. |
| Start Zoiper when you log in | Start Zoiper when you log in to Zoiper |
| E'er on top | Keep zoiper as the top application. |
| Cheque for updates | Automatically check if a new version of Zoiper is available on every startup. |
| Automatically open urls | Open a url when ane is received from the server. |
Notification
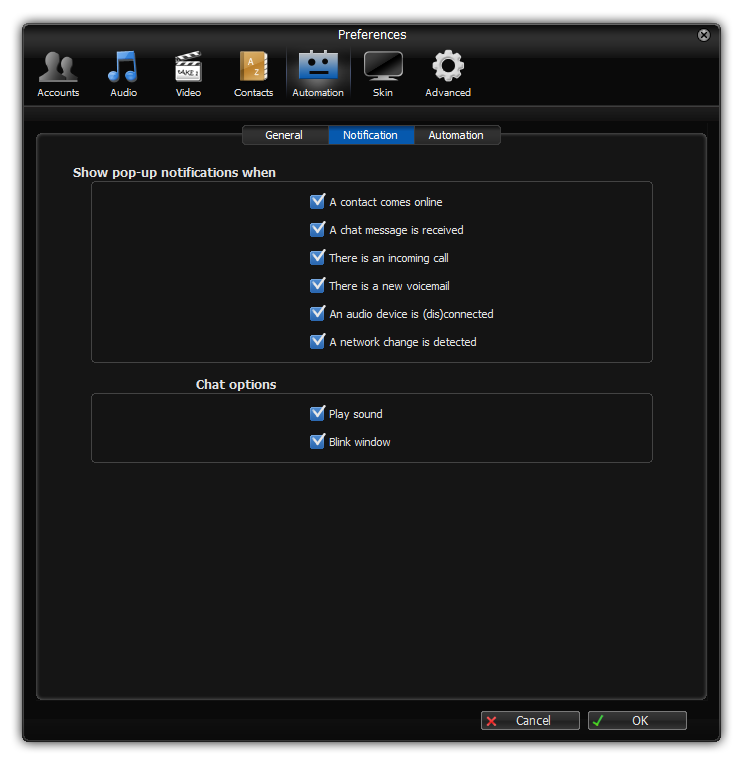
This folio lets y'all configure when to shop a popup and configure what notifications you'd similar when y'all receive a chat message.
Automation
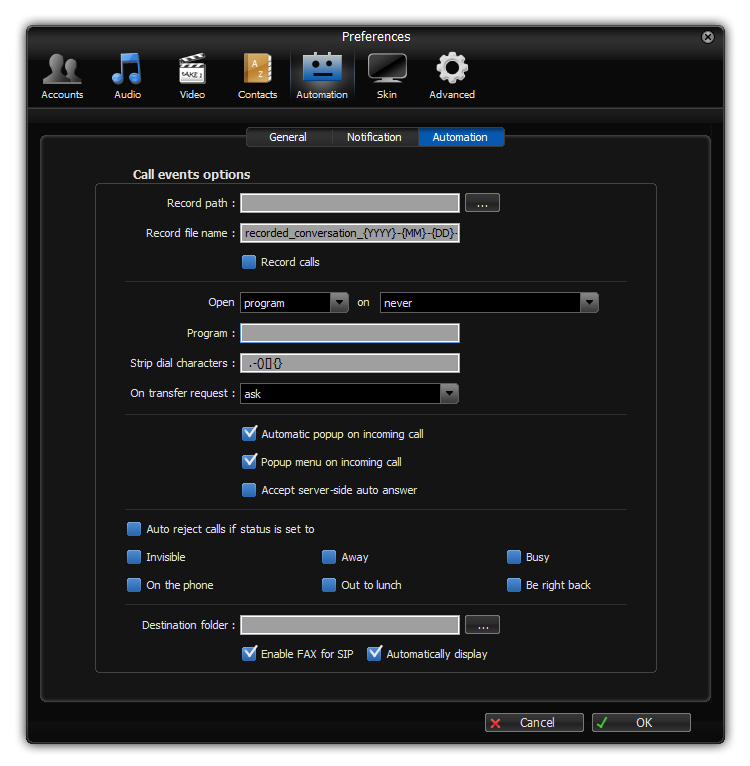
| Record path | This lets you configure the directory where yous wish to shop the call recordings. The checkbox below enables or disables recording of all calls. You can at any time showtime recording a call from the active dial panel. Several parameters are available:
Example: recorded_conversation_{YYYY}-{MM}-{DD}-{HH}_{NN}_{SS}_{account}_{number}_part{recording_part} On this case record file name will include: yr-month-day-hour_minute_second_contact telephone number_account proper name | ||||||||||||||||||||||
|---|---|---|---|---|---|---|---|---|---|---|---|---|---|---|---|---|---|---|---|---|---|---|---|
| Open program | On the aforementioned folio you can also configure to automatically open a plan on an incoming calls, answered calls, outgoing calls and on telephone call hang-up. This functionality is usually used to automatically open an external plan or website with sure parameters. This could exist used to automatically make a note in a CRM packet that a certain customer client contact was made or to automatically open a CRM package for the relevant customer for the incoming call.
| ||||||||||||||||||||||
| Strip dial characters | This contains a list of characters that will exist removed from the telephone number prior to dialing. | ||||||||||||||||||||||
| On transfer asking | This sets the preferred style of handling incoming transfer requests. The possible options are ever accept, always reject and ask the user. | ||||||||||||||||||||||
| Automatic popup on incoming phone call | The software will motility to the foreground on each incoming telephone call. | ||||||||||||||||||||||
| Popup menu on incoming call | Popup a carte du jour with a request for user intervention on each incoming call to respond, pass up or ignore the phone call or outset a video telephone call. 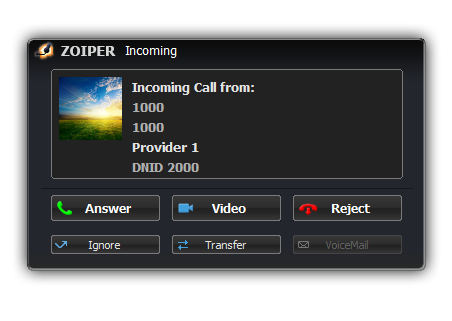 | ||||||||||||||||||||||
| Take server-side auto respond | When the server sends a special bundle to answer the call, the softphone volition automatically answer the call. | ||||||||||||||||||||||
| Motorcar reject calls if status is gear up to | If the status is 1 of the selected possibilities, reject all calls. |
Skin
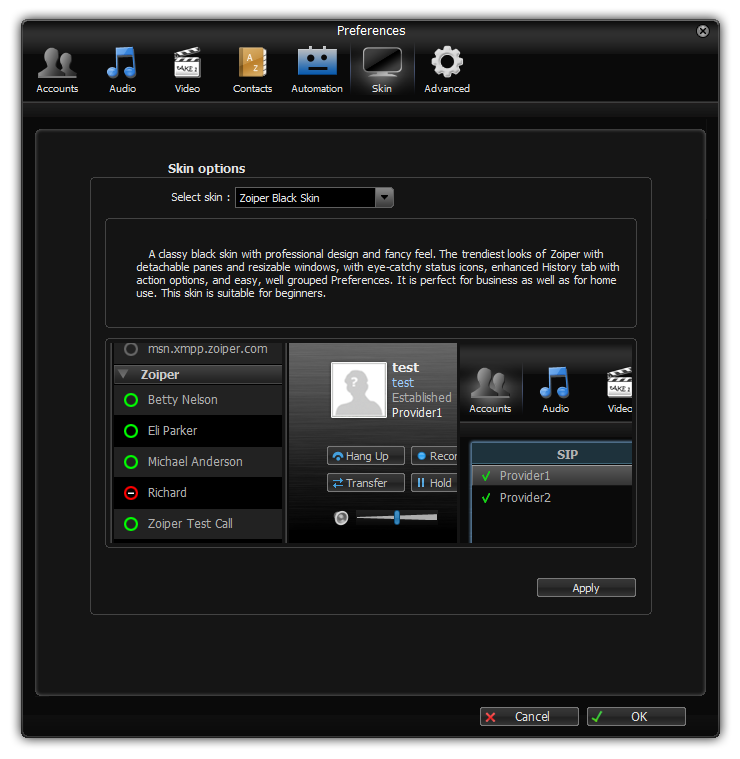
Skin
On the pare selector page you tin can select the skin of your liking.
Select a skin from the dropdown, click on apply and restart Zoiper.
Advanced
The advanced panel lets you configure a range of protocol settings, configure provisioning and active some troubleshooting tools.
The provision tab:
The provisioning tab lets you store a username and password to be used in combination with the provisioning URL that is stored in a text file in the same folder equally Zoiper.
Network options
This volition set some QoS (Quality of service) tags on the signaling and media packets.
villarealmycou1966.blogspot.com
Source: https://www.zoiper.com/en/documentation/windows-installation-and-configuration
0 Response to "Sip Phone Manual if You d Like to Make a Call Please Hang Up and Try Again"
Postar um comentário